The following section describes how you can use LANconfig to manage the data volumes exchanged with remote sites.
-
In the configuration dialog, navigate to the item .
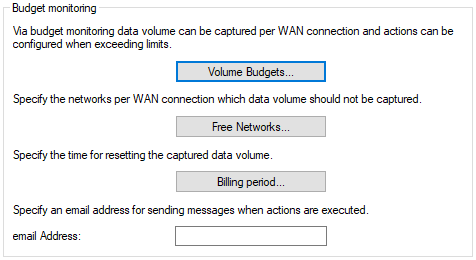 Note: If the device should send an e-mail when your data volume is exceeded, you can enter the required address into the field E-mail address.
 -
Click on Volume budgets and then on Add.
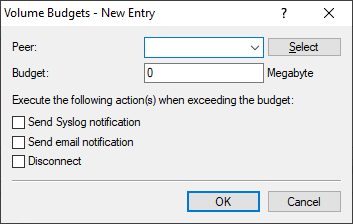
The item Peer lets you select the remote site which requires a volume budget. With Select you can choose from the available remote sites or manage new ones.
Specify the data volume in the Budget field. In most cases this value is the permitted data volume specified by the provider before the data rate is throttled.
Further, you can specify actions that the device should perform when the budget is reached:- Send SYSLOG notification: When the thresholds 80% and 100% of the budget are reached, the device stores a SYSLOG message (with the flag "Critical") that you can analyze with LANmonitor or a special SYSLOG client.
- Send e‑mail notification: When the 80% and 100% thresholds are reached, the device sends a notification to the e-mail address you specified in the dialog above.
- Disconnect: The device disconnects from the remote site. Note: The disconnect action activates the charge limiter. The device can no longer connect to this remote until the end of the month unless you increase the volume budget for this remote site.
You can also specify that the device should perform multiple actions. If they include the action disconnect, the device performs this action as the last one.
-
If data transfer to certain networks does not affect the volume budget for a remote site, you can exclude these networks from the budgeting. To do this, click on Free networks and then on Add.
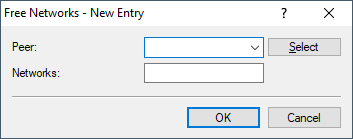
The item Peer lets you select the remote site which is to be excluded. With Select you can choose from the available remote sites or manage new ones.
Note: You can make multiple entries for each remote by suffixing the name of the remote site with the # character and adding a number (e.g. "INTERNET", "INTERNET#1", "INTERNET#2", etc.). This is useful if you explicitly wish to define an exception that is only temporarily active. When this exception is no longer valid, you delete only the entry with the correspondingly numbered remote site.In the Networks field you can specify IPv4 and IPv6 addresses and also whole networks in prefix notation (for example "192.168.1.0/24"). Separate each entry with a comma. Here too you can add the # character and a digit to the remote site name.
-
If you want to change the preset values, select the line containing the peer named "*" and click on Edit; otherwise click on Add.
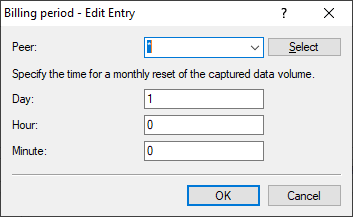
The item Peer lets you select the remote site for which you want to set the time when the period starts. With Select you can choose from the available remote sites or manage new ones.
Note: You can use wildcards for the names of the remote sites. The wild card "*" in this case applies for all remote sites.In the fields Day, Hour and Minute you set the day of the month and the time at which the device resets the budget for this peer.
Important: By default the device resets the budget for all peers on the first day of the month at 00:00h.Important: If you enter the value "31" in the field Day, the device does not reset the budget in months with fewer days (e.g. February or November).