The following instructions describe how to disable the automatic topology management and the configuration of manual P2P links according to the scenario described under Manual topology management.
-
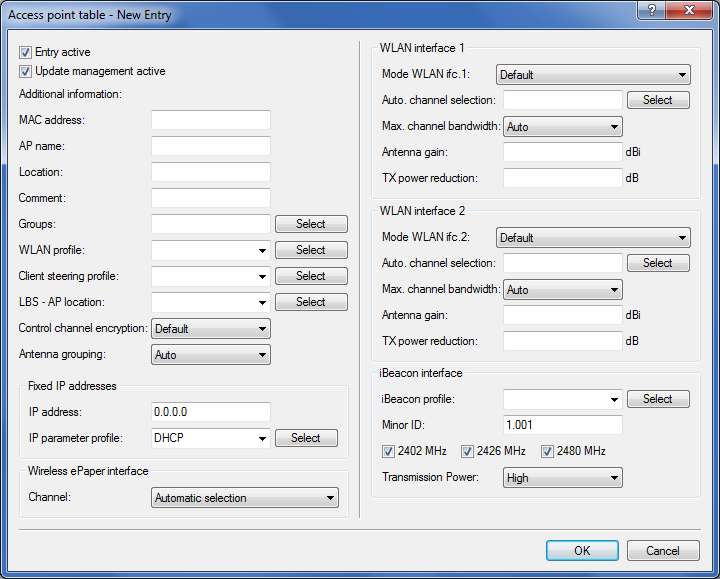
Open the configuration dialog in LANconfig and click on WLAN controller > AP configuration > Access point table to access the list of managed access points.
-
For each unassociated AP, enter the MAC address and a unique identifier under AP name. You will reference this name later in the topology configuration.
For the example scenario, the individual configuration entries are as follows:
Table 1. Configuring the unassociated APs in the access point table Entry MAC address AP name 01 00-80-63-a6-3d-f0 AP-00 02 00-a0-57-99-c6-4f AP-01 03 00-80-63-b1-df-87 AP-02 04 00-a0-57-12-a8-01 AP-03 05 00-80-63-d9-ae-22 AP-04 06 00-a0-57-60-c4-3d AP-05 07 00-a0-57-24-d4-1b AP-06 08 00-80-63-a8-b1-37 AP-07 09 00-80-63-b1-df-99 AP-08 10 00-a0-57-33-e1-05 AP-09 Note: The table entry AP-00 refers to your existing AP, which the unassociated APs use as an anchor AP. -
Select the WLAN profile for which you have enabled AutoWDS.
By means of the corresponding WLAN profile, the APs automatically receive the settings for AutoWDS and hence for the P2P configuration.
- Close the dialog window with OK and save the configuration to the device.
- Log on to your device via WEBconfig or the console.
- In the setup menu, switch to the table WLAN Management > AP Configuration > AutoWDS Profiles.
- Edit the AutoWDS default profile by clicking on the entry DEFAULT.
- Change the Topology-Management parameter to Manual and save the settings by clicking on Send.
- Navigate to the table WLAN-Management > AP-Configuration > AutoWDS-Topology and click on Add.
-
For each P2P pair, create a manual P2P configuration. The specified P2P link is always considered from the perspective of the slave AP.
- In the field AutoWDS-Profile, specify the AutoWDS profile that applies for the manual P2P configuration, for example DEFAULT.
- Set the Priority of the P2P configuration to 0 (highest priority).
-
For the Slave-AP-Name and Master-AP-Name, enter the names of the APs according to your hierarchy.
For the example scenario, the individual configuration entries in the case of strict interface pairing are as follows:
Table 2. Configuring the P2P pairs in the AutoWDS-topology table Entry Slave-AP-Name Slave-AP-WLAN-Ifc. Master-AP-Name Master-AP-WLAN-Ifc. 01 AP-01 WLAN-1 AP-00 WLAN-1 02 AP-02 WLAN-2 AP-01 WLAN-2 03 AP-03 WLAN-1 AP-02 WLAN-1 04 AP-04 WLAN-2 AP-00 WLAN-2 05 AP-05 WLAN-1 AP-04 WLAN-1 06 AP-06 WLAN-2 AP-05 WLAN-2 07 AP-07 WLAN-1 AP-00 WLAN-1 08 AP-08 WLAN-2 AP-07 WLAN-2 09 AP-09 WLAN-1 AP-08 WLAN-1 -
Under Key specify the WPA2 passphrase used by the P2P partners to encrypt the P2P link.
Select the most complex key possible, with at least 8 and maximum 63 characters. The key requires at least 32 characters to provide encryption of suitable strength. If you leave the field empty, the device automatically generates a passphrase with a length of 32 characters.
- Switch the entry Enabled to Yes.
- Save the entries by clicking on Send.
If APs were already connected, the WLC sends the new configuration to these APs, which triggers the reconfiguration procedure for each one. If no APs were connected, the WLC transmits the P2P configuration when the unassociated APs connect for the first time.