The following configuration steps show you how to manually setup a Public Spot for simple scenarios. For the application scenario described here, you enable the Public Spot on an interface over which there is no other data traffic other than the Public Spot traffic – where Public Spot and normal WLAN users do not share the same network (dedicated SSID).
-
Select the interfaces for the Public Spot operation.
Here you activate the interfaces which will be available to registered users. Along with the logical WLAN interfaces which Public Spot users directly login to, the logical LAN interfaces (LAN-1, etc.), and the point-to-point connections (P2P-1, etc.) can also be selected. When connected via the LAN or P2P interface, additional access points can be integrated into the Public Spot provided by another device. For a single access point, on the other hand, you select, for example, the logical WLAN interface WLAN-1.
- LANconfig:
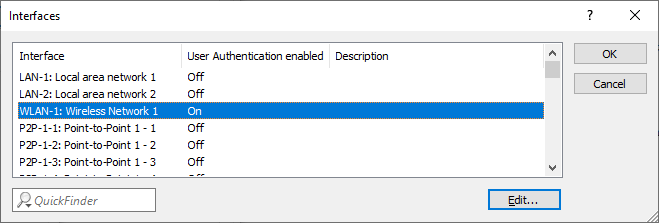
By activating the authentication for a WLAN interface, you automatically release the associated SSID for the Public Spot operation.
Note: On a WLC you can enable certain Ethernet interfaces for the Public Spot. In this manner you can also set up selective restrictions for certain VLANs. -
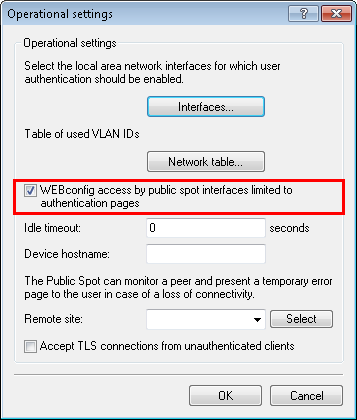
Access to your device from the Public Spot network should be restricted to the authentication pages.
If you do not restrict access, Public Spot users will be able to access the configuration interface of your device (WEBconfig). For security reasons you should not permit this.
- LANconfig:
-
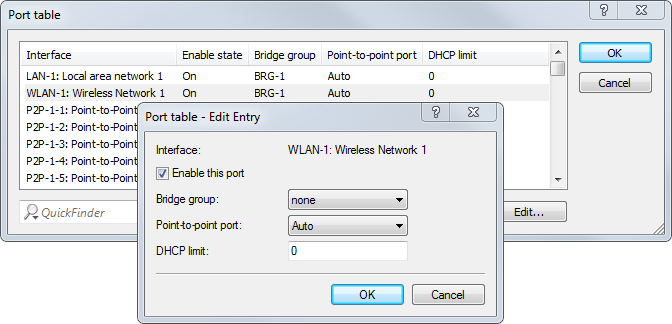
Disconnect the interface which is to be used for Public Spot operations from the other network traffic.
In order for end devices to be able to communicate with one another via the different interfaces of a Public Spot device (e.g., between LAN-1 and WLAN-1), these interfaces are logically connected to one another (bridged) within your device. However, in a Public Spot scenario this type of bridging may not be desirable for security reasons. In order to disconnect the communication between an interface (e.g., WLAN-1) assigned to a Public Spot and the rest of the network, you have to remove bridging. In the Port table set the Bridge group for the respective interface to none.
- LANconfig:
-
Enable the WLAN for the Public Spot.
This setting does not affect: Routers, WLAN controllers, central-site gateways.
Activate the logical WLAN which you enabled for the Public Spot login and assign a descriptive name to this network (SSID).
- LANconfig:
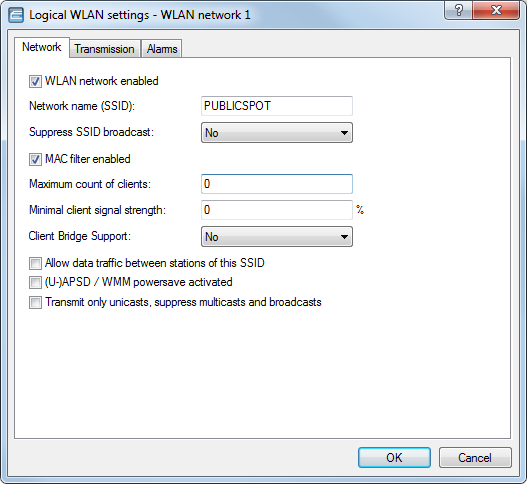
Note: If you do not set up a private WLAN, you should disable the setting Allow data traffic between stations with this SSID for security reasons. This prohibits communication between the individual Public Spot users. -
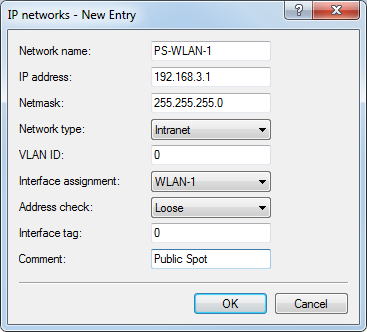
Assign the IP address and netmask to the device that your Public Spot network should specify.
The Public Spot module has its own address on your network, which is independent from the address that you assigned to your device. For example, if you have a 192.168.0.0/24 network set up and your device has the IP address 192.168.2.1, you can assign the IP address 192.168.3.1 and the subnet mask 255.255.255.0, as long as this IP address has not already been used elsewhere. Select the interface that you chose under Interface assignment e.g., WLAN-1.
- LANconfig:
Note: If your device is not directly connected to the Internet and you have a different address range for your Public Spot, you must set up a return route to your Public Spot network on your Internet gateway. If there is no return route, Public Spot users will see an HTTP error after they have successfully authenticated.Please find the directions on how to set up a return route, in the documentation for your Internet gateway. In LANconfig you configure this under . To do this, create a new entry and enter the network address of your Public Spot network under IP Address and under Router enter the address of the Public Spot in your local network.

-
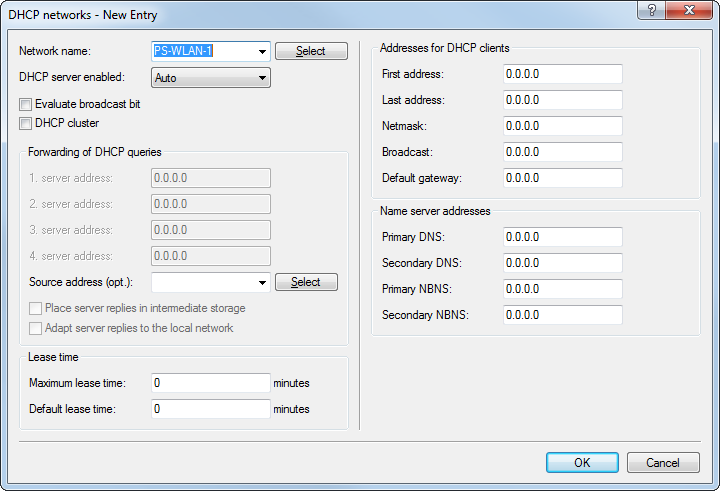
Configure the DHCP server settings for the Public Spot network.
Since the device has an IP network that is independent from the network where it is located, you must configure a DHCP server for this network. For the previously set up IP network (e.g., PS-WLAN-1), set the value for DHCP server enabled to Yes.
- LANconfig:
-
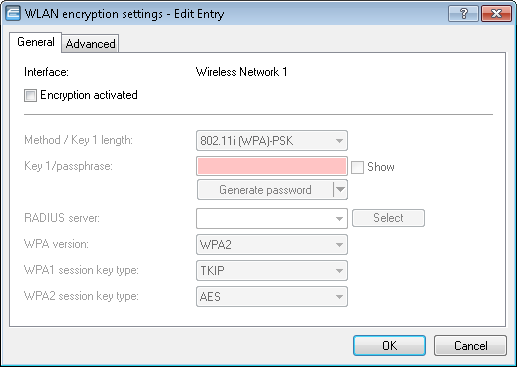
Disable the encryption for the interface that you are using for the Public Spot.
This setting does not affect: Routers, WLAN controllers, central-site gateways.
Encryption for all logical WLANs is enabled by default. In Public Spot applications, the payload data between the WLAN clients and the access point are usually transmitted unencrypted. For this reason, go to and disable encryption for the logical WLAN which you previously set up for the Public Spot login.
-
Select the authentication mode and the protocol used for the user login.
The authentication method that you select determines the information which users of the Public Spot WLAN must enter when logging in. Select Authenticate with name and password to allow your users the option to login with an individual username and password that you have previously assigned them. This setting also allows you to quickly provide Hotspot access to your guests using vouchers (tickets).
Use HTTPS as the protocol in order to be able to send encrypted login data to your users during login.
- LANconfig:
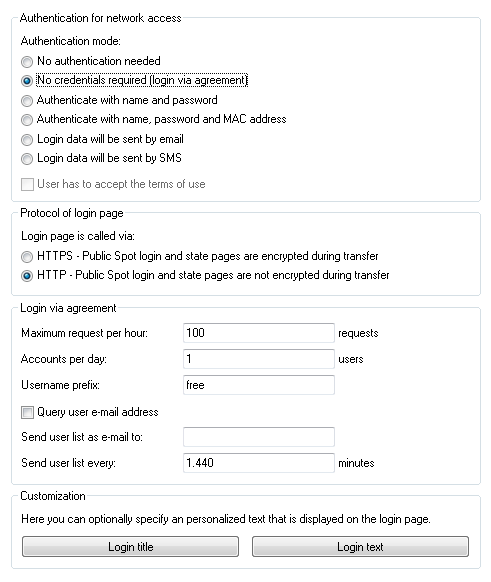
Note: Pay attention to the fact that, when you select the setting No authentication needed, unauthorized persons can have unlimited access to your Public Spot! -
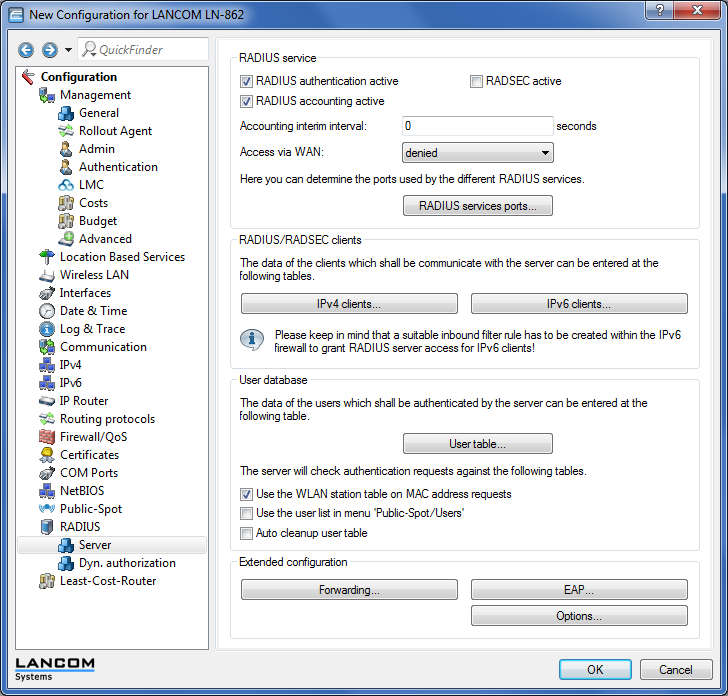
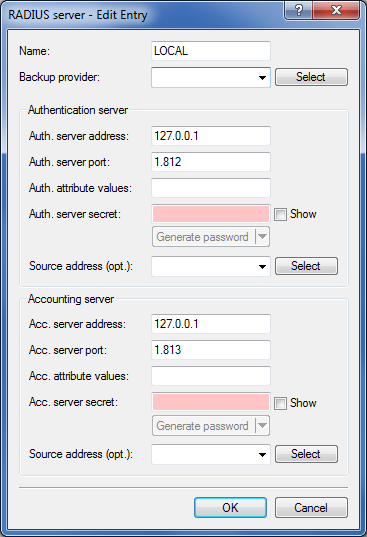
Activate the internal RADIUS server for user administration and accounting.
You store Public Spot access accounts in the user database on the device's own RADIUS server.
- LANconfig:
-
By default, the Public Spot is preconfigured to use the internal RADIUS server.
The list entry is necessary in order for the Public Spot to recognize the address of the RADIUS server and so that it can authenticate Public Spot access on the internal RADIUS server.
- LANconfig:
-
Set up filter rules in the Public Spot's firewall to secure your local network. In each case, create an "accept" rule (for example, ALLOW_PS-WLAN-1) and a "reject" rule (for example, DENY_PS-WLAN-1).
You use the accept rule when devices are to be able to send DNS requests from the Public Spot network to all local networks, e.g., your local intranet. On the other hand, with a reject rule you generally block all access or requests from the Public Spot network to your local network. The order – accept before reject – is essential, since the firewall applies rules from the top to bottom of the list.
- LANconfig:


- Settings for the Accept rule:
- Settings for the Reject rule: