Setting known loopback addresses

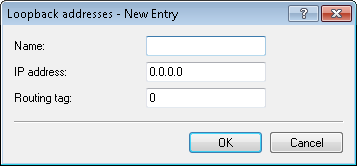
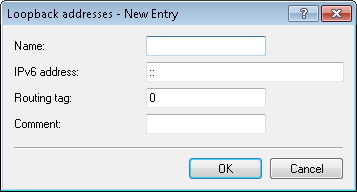
Your device can be assigned up to 16 IPv4 and 8 IPv6 loopback addresses where the device can be reached (e.g. for managing larger network structures). To use the loopback addresses for particular networks (e.g. in the context of Advanced Routing and Forwarding), you can assign routing tags to these addresses. To simplify the identification in other configuration units, the loopback addresses can be given freely definable names.

The following steps show you how to set a loopback address.

  1. Start LANconfig and open the configuration dialog for the device.
  2. Navigate to the dialog IPv4 > General > Loopback addresses or IPv6 > General > Loopback addresses and click on Add.


  3. Use the input field Name for a name of your choice for the loopback address, e.g. LOOPBACK_1.
  4. Enter the loopback address for this device into the input field IP address or IPv6 address, e.g. 10.0.0.99 for an IPv4 address or ::1 for an IPv6 address.
    The device considers each of these addresses to be its own address and behaves as if it has received the packet from the (W)LAN. This applies in particular to masked connections. Responses to packets sent to a loopback address are not masked.
  5. Use the input field Routing tag to enter an optional routing tag for the loopback address.
    Loopback addresses with the routing tag '0' (untagged) are visible to all networks. Loopback addresses with a different routing tag are only visible to networks with the same routing tag.
  6. For IPv6 loopback addresses, the Comment field allows you to enter an additional comment.

www.lancom-systems.com

LANCOM Systems GmbH | A Rohde & Schwarz Company | Adenauerstr. 20/B2 | 52146 Wuerselen | Germany | E‑Mail info@lancom.de

LANCOM Logo