Adding Public Spot users with a single click and voucher printing

The following section describes the setup of a Public Spot user using WEBconfig and then printing a voucher. You can also prepare vouchers in advance.

Note: You need the permissions for the Public Spot Wizard (create user), in order to create a new Public Spot user.
  1. Log on to the WEBconfig home page as an Administrator.
  2. Start the setup wizard by clicking on Setup wizards > Create Public Spot account


  3. The new user wizard starts with an input screen. The fields have default values.


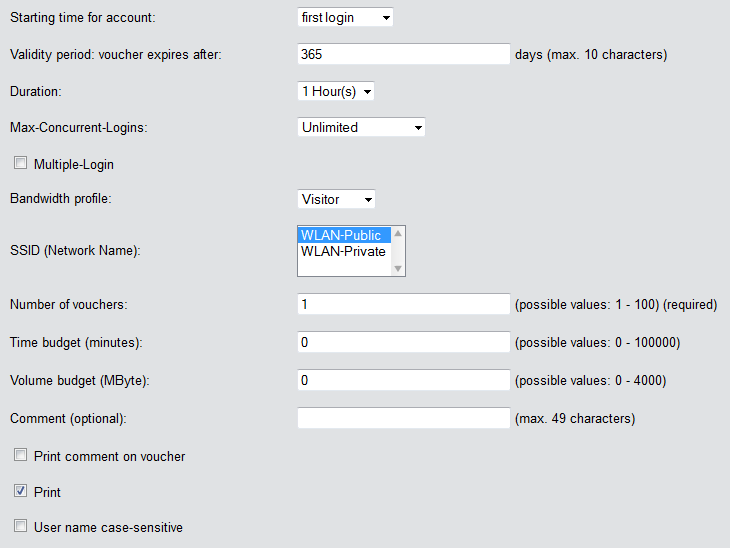
    The wizard automatically creates a username and a password. In the subsequent printout dialog you can select the voucher printer and print-out the voucher.

  4. If necessary, you can change the default values before you print it.

    The following entries affect the appearance as well as the validity of the vouchers:

    • Starting time for account: Sets the time when the voucher becomes valid. With the setting first login, the access budget runs as of the first login; with the setting immediately, it applies as of the time that the user was created.To a supply of vouchers in advance, select First login as the validity of the vouchers. That way the vouchers will still be valid even after a longer period.
    • Validity period: Voucher expires after: Enter the overall time period within which the voucher can remain valid. If the access is to be valid immediately, it is not possible to enter a validity period.
    • Duration: Set how long access is to be available after registration or the first login. The values listed here are managed in the Default validity periods table.
    • Max-Concurrent-Logins: Select the maximum number of concurrent devices that can have access to the user account for the corresponding user. The values listed here are managed in the Max. concurrent logins table.
    • Multiple login: Select this option in order to generally allow users to login with several devices using the same login data. The number of devices that can be logged on simultaneously is specified using the drop-down list Max-concurrent-logins.
    • Bandwidth profile: Select a bandwidth profile from the list in order to selectively restrict the amount of bandwidth available to the user (uplink and downlink). Create a bandwidth profile in the Bandwidth profile table.
    • SSID (network name): Specify which wireless LAN network the access applies to. This SSIDs listed here are managed in the SSID table. By pressing the "Ctrl" button you have the option of selecting multiple entries. Default entries are already pre-selected.
      Note: If you have not defined any entries in the table, the wizard conceals this option.
    • Number of vouchers: Specify how many vouchers you want to create at a time. If you set the login time as the access start time, you can print-out a supply of vouchers in advance.
    • Time budget (minutes): Specify the amount of time after which access to the Public Spot is closed. Depending on the chosen expiry method, access time is limited either to the time budget (incremental) or to the set voucher validity period (absolute).
    • Volume budget (MByte): Specify the available data volume after which access is closed.
    • Comment (optional): Enter a comment here. This comment can contain, for example, additional notes about the access duration or the telephone number of the receptionist in case of access problems.
    • Print comment on voucher: Check this option if the comment is to appear on the voucher.
    • Print: Check this option to print the vouchers as soon as they are registered.
    • User name case-sensitive: Enable this option if Public Spot users have to pay attention to capitalization when entering their user name at login.
  5. If you want to keep the default values or accept the new values without changing them, you click on Save and print at the end.

    If the Print option is disabled, the wizard displays a summary of the new Public Spot users after they have been registered. You then have the opportunity to print the vouchers again.

    The button Manage User Wizard button takes you to the Manage Public Spot Account Setup Wizard.


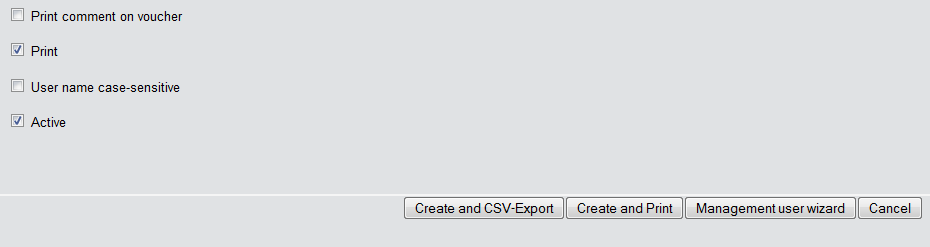
    Note: You have the option to either show or hide this button. It is displayed by default.

www.lancom-systems.com

LANCOM Systems GmbH | A Rohde & Schwarz Company | Adenauerstr. 20/B2 | 52146 Wuerselen | Germany | E‑Mail info@lancom.de

LANCOM Logo