When configuring the LANCOM, the following steps must be carried out:
- Set up the line to the SIP provider
- Enabling the ISDN interface and assigning MSNs to the internal numbers
Detailed instructions on configuring the LANCOM:
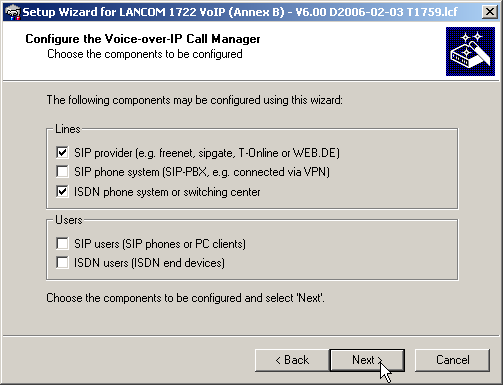
- Under LANconfig, start the setup wizard for configuring the VoIP Call Manager. Enable the options 'SIP phone system', 'ISDN phone system' and 'ISDN users'.
- Enter a unique domain for the local VoIP domain which describes the local VoIP range for the site (e.g. 'mycompany.internal'.)
- Configure the line leading to the SIP provider, for example with the name 'SIPPROVIDER' with the following values:
- Internal standard number: All calls that come in through the SIP provider are forwarded to this internal number. Enter an internal number from your dialing plan here, e.g. '11'.
- SIP domain/realm: You received this domain from your SIP provider; it is usually entered in the format 'sipdomain.tld' without the part that designates a specific server.
- Registrar (FQDN / IP) (optional):
- Outbound proxy (optional)
Note: The server description is generally not required; the DNS query for the SIP domain returns this information. Enter a server designation here only if your provider has informed you of the corresponding addresses.
- SIP ID / user: Enter the SIP number with local area code here, providing that the SIP provider does not require any other information.
- Display name (optional): The display name is only required if the SIP provider verifies this during registration. If you enter a display name here, then this name will be displayed at the remote site. If the field remains empty, then the display name for the corresponding internal user is transmitted.
- Authentication name (optional): Special authentication names are not supported by all SIP providers. In many cases, the authentication name is the same as the SIP ID or the user name. Complete this field only if your SIP provider has issued you a special authentication name.
- Password: Enter the password for SIP access here.
Note: This description applies to a "user-defined configuration". If you select a special SIP provider from the list, then some of the parameters will be pre-configured automatically.
- Configure an ISDN line for VoIP telephony use. For every MSN on your ISDN connection, make an assignment to an internal number within your telephone number plan during ISDN mapping.
- MSN 1 '555 555 1' / internal number '11'
- MSN 2 '555 555 2' / internal number '12'
- Enter the local and national area code for the device's location. Using this information, the Voice Call Manager can decide whether or not outgoing calls are local calls, national or international long distance calls.
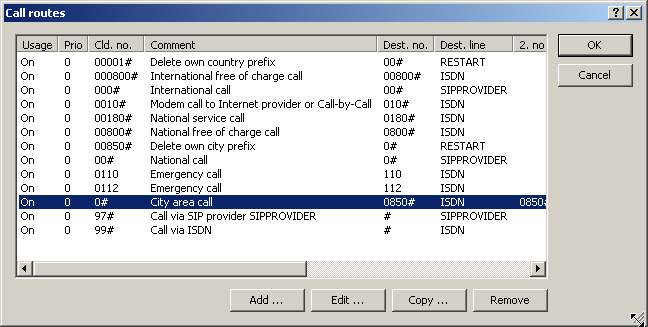
- Based upon the entries made so far, the LANconfig creates a suggestion for the call routing table which you can adapt to fit your requirements as follows:

This suggested call routing table would place all external calls over the ISDN line. The SIP line is set up as a backup for international and national long distance calls and local calls that are not in the list of special or emergency numbers.
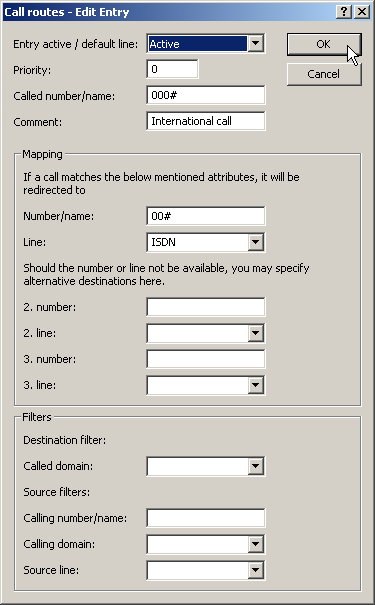
In order to channel calls to special destinations, such as international and national long distance calls, over the SIP provider, double-click on the corresponding entry in the table and switch the line used from 'ISDN' to 'SIPPROVIDER'. Don't forget to switch the backup line from SIP to ISDN, if necessary!
After being adapted for international and national long distance, the call routing table should appear as follows: