Wireless ePaper Displays from LANCOM offer state-of-the-art digital signage for a wide range of applications. The Displays are controlled by an innovative wireless technology with extremely low power consumption.
Activate the Wireless ePaper radio module in LANconfig under .

- Operating
-
Use this to activate the Wireless ePaper feature in the access point.
Note:
The server must be configured for the connection type ThinAP2.0/TCP. Please refer to the LANCOM Support Knowledge Base for further information. Use the same method to set the following two configuration options to enable communication between the server and LCOS LX access points:
accessPointUseThinMode?value=true accessPointThinUseOutboundMode?value=true
This can be done, for example, with "curl" as follows:
curl -X PUT http://localhost:8001/service/configuration/accessPointUseThinMode?value=true curl -X PUT http://localhost:8001/service/configuration/accessPointThinUseOutboundMode?value=true
Note: The legacy connection mode via UDP is not supported by LCOS LX.
Wireless ePaper Server
Activate the Wireless ePaper Server in LANconfig under .
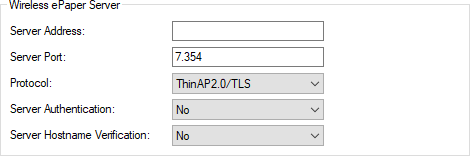
- Server address
- Here you configure the IP address of the Wireless ePaper Server that the access point should contact.
- Server port
- The TCP destination port to be used for communication with the server.
- Protocol
- The protocol used to communicate with the server.
- Server Authentication
- Optionally, the access point can check the server certificate of the Wireless ePaper Server when it connects to it. If this option is enabled, a corresponding CA certificate (or certificate chain) in PEM format must also be loaded onto the access point via WEBconfig.
- Server Hostname Verification
- In connection with the Server Authentication option, this setting decides whether the "Common Name" specified in the certificate is checked for a match with the host name of the addressed Wireless ePaper Server.
Channel selection
Activate the channel used by the Wireless ePaper Server in LANconfig under .
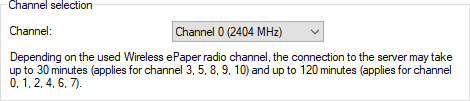
- Channel
-
Configure the radio channel to be used for controlling the Wireless ePaper Displays.
Note:
Depending on the radio channel used, connecting the server to a Display can take up to 30 minutes (channels 3, 5, 8, 9, 10) or up to 120 minutes (channels 0, 1, 2, 4, 6, 7). If possible, you should prefer the channels 3, 5, 8, 9 and 10, as Wireless ePaper Displays scan them more frequently and they do not interfere with the popular Wi‑Fi channels 1, 6, and 11.
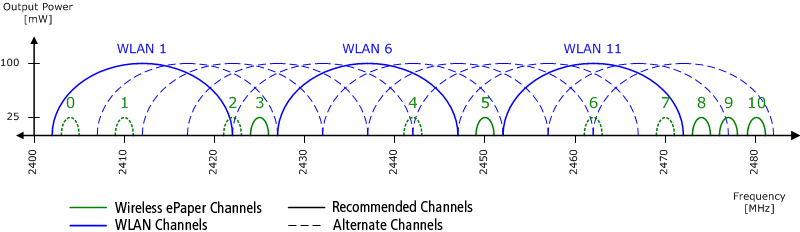
Important: Do not select the same channel for two access points that are in the same area. This causes interference and prevents Displays from joining the network. It is possible to set the same channel on two access points if you are sure that each display is only within range of one of these access points.
Network
Configure an optional separate network interface of the Wireless ePaper Server in LANconfig under .This function allows you to specify a separate IP/VLAN interface for the access point’s Wireless ePaper client. This means that the connection to the ePaper server or the Vusion Cloud can be established via a separate interface from the standard management IP/VLAN interface.
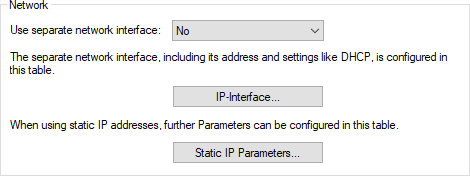
- Use separate network interface
- Activate a separate interface for the connection to the ePaper server or the Vusion Cloud.
- IP interface
-
Configure the separate IP interface for the connection to the ePaper server or the Vusion Cloud.

- Interface name
- The interface is always "Wireless-ePaper". This is referred to by the other settings made here.
- Interface-ID
- The internal identifier for the interface.
- VLAN-ID
- Here you specify a VLAN ID for which the interface should be active and accessible. The default value "0" means that no VLAN is used.
- IPv4 address source
-
Here you select how the IPv4 address of the interface is to be obtained.
- DHCP
- The IP address is retrieved via DHCP.
- Static
- The static IP address configured for the interface is used.
- IPv6 address source
-
Here you select how the IPv6 address of the interface is to be obtained:
- Router-Advertisement
-
The IPv6 address is derived from router advertisements that the device receives on the respective interface.
Note: If the flag in the router advertisement is set to Other and/or Managed, additional configuration options are obtained via DHCPv6—even if the address source is set to Router-Advertisement.
- DHCPv6
- The IPv6 address is obtained via DHCPv6.
- Static
- The static IPv6 address configured for the interface is used.
- Static IPv4 address
- Here you configure the IP address to be used when the IPv4-Address-Source is set to Static. Add the subnet mask in CIDR notation (e.g. "/24") as a suffix.
- Static IPv6 address
- Here you configure the IP address to be used when the IPv6-Address-Source is set to Static. Add the subnet mask in CIDR notation (e.g. "/64") as a suffix.
- Static IP Parameters
-
Here you configure the IP and network settings that apply when you use static IP addresses.
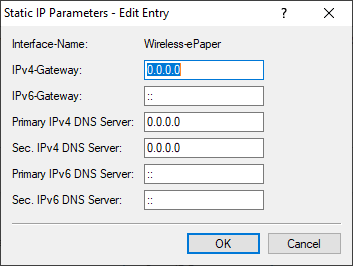
Important: The settings made in this table only come into effect if the IPv4 or IPv6 address source for the IP interface is set to static. Otherwise all of the necessary information is retrieved via DHCP, for example, in which case no configuration is required here.- Interface name
- The interface is always "Wireless-ePaper". This is referred to by the other settings made here.
- IPv4-Gateway
- Here you configure the IPv4 gateway for the referenced interface.
- IPv6-Gateway
- Here you configure the IPv6 gateway for the referenced interface.
- Primary IPv4 DNS server
- Here you configure the primary IPv4 DNS gateway for the referenced interface.
- Secondary IPv4 DNS server
- Here you configure the secondary IPv4 DNS gateway for the referenced interface.
- Primary IPv6 DNS server
- Here you configure the primary IPv6 DNS gateway for the referenced interface.
- Secondary IPv6 DNS server
- Here you configure the secondary IPv6 DNS gateway for the referenced interface.